Preparing for a roof replacement can be as daunting as it is crucial, especially in a climate like South Florida’s. Whether you’re safeguarding a cozy home in Parrish or a bustling business in Sarasota, understanding each step of this undertaking allows you to navigate it with confidence and clarity. As you invest in fortifying your home or commercial property, the process encompasses more than just structural changes; it translates into protecting your investment from the region’s demanding weather.
Beginning with a solid checklist, from selecting appropriate materials suited for South Florida’s conditions to planning around the inherent disruptions of construction, is paramount. With the knowledge of the sequential tasks involved—like tearing off old roofing, inspecting decking for hidden damages, to finally laying new shingles—homeowners and property managers alike can manage expectations and ensure a seamless transition to a new, resilient roof. This foundation not only extends the roof’s lifespan but also enhances the adaptability and value of your property in the face of Florida’s unpredictable elements.
Preparation Checklist: Getting Your Home Ready for Replacement
Homeowners in Parrish often find themselves preparing for roof replacement, a significant investment that can enhance home value and protect against the unpredictable Florida weather. Proper preparation can ensure a smoother process and minimize disruptions to your daily life. Here’s a comprehensive checklist to help you get ready for your upcoming roof replacement.
Understanding the Process
Start by understanding the roof replacement process. Generally, it involves removing the old roof, inspecting the underlying deck, installing new underlayment, and finally placing new shingles or other materials. Knowing these steps helps in anticipating what to expect and ensures that you can communicate effectively with your roofing contractor.
Choose the Right Materials
Selecting materials is crucial for roof longevity and efficiency. In a climate like that of South Florida, impact resistance and wind uplift ratings are important. Metal roofs and tiles can offer durability, while asphalt shingles provide cost-effective options. Consult with your roofing contractor to assess which materials will best suit your needs given the local climate and your budget. According to the Insurance Institute for Business & Home Safety, choosing resilient materials can improve your roof’s lifespan significantly.
Clear the Area
Before the roofers arrive, clear the surrounding area of vehicles, outdoor furniture, and yard decorations. This prevents damage from falling debris and provides an unobstructed workspace for the roofing crew. Access to your driveway might be required for loading and unloading materials, so plan accordingly.
Secure Loose Items Inside
The replacement process can cause vibrations throughout your home. To prevent items from falling, secure or temporarily relocate lightweight, fragile items on shelves or walls. Structural vibrations are common, so taking precautions against falling objects is a practical move.
Protect Belongings in the Attic
Roof replacement exposes your attic to the elements and debris. Cover stored items with durable tarps or old sheets to protect them from dust and particles. Padding the area can also help mitigate vibrations.
Discuss Safety Protocols
Communicate with your contractor about safety and noise protocols. This will help manage your expectations and those of your family during construction. Be aware of potential hazards, especially if children or pets are at home. Ensuring everyone knows which areas to avoid can prevent accidents.
Plan for Noise
A roof replacement is noisy. If you or your neighbors work from home or if children are studying, noise can disrupt activities. Consider temporary relocation options during working hours to minimize disturbances. Handy personal devices like noise-canceling headphones could provide relief if staying home.
Check Previous Repairs
Ensure any previous repairs meet current codes and standards. Poor repairs might need re-addressing, which can save time and money in the long run. A comprehensive inspection will reveal areas needing attention before installation begins.
Coordination with Neighbors
Inform neighbors of the scheduled work. This courteous gesture prepares them for possible noise and heavier street traffic from workers and delivery trucks. Clear communication helps maintain good neighborly relations and prevents any complaints during the replacement process.
Weather Forecast
Always check weather forecasts leading up to the replacement. While roofers aim to work around rain, sudden storms can happen. Knowing what to expect helps avoid surprises should work delays occur.
Finalize Contract Details
Verify that the contract details are clear and cover all aspects of the job. Important components include timeline, payment terms, and warranty information. A thorough understanding of these elements will provide peace of mind and assurance of quality work.
Check Contractor Reputation
Ensure that your roofing contractor is licensed, insured, and has a solid reputation. Online reviews and Better Business Bureau ratings offer insight into their reliability and track record. Selecting a reputable company, like Roofline Roofing, minimizes long-term risks and guarantees skilled workmanship.
Preparing your home for a roof replacement involves a mix of practical steps and proactive communication. By following this checklist, Parrish homeowners can ensure that their roof replacement proceeds efficiently and safely, ultimately protecting their investment and enhancing their home’s resilience against Florida’s harsh weather conditions.
The Day of: Understanding the Replacement Process
On the day of your roof replacement process Anna Maria or elsewhere, knowing what happens helps alleviate stress and manage expectations. While the sight of contractors on your roof may be unfamiliar, understanding each step will help you feel in control as the project progresses.
Early Arrival and Setup
Expect the roofing crew to arrive early. This early start maximizes daylight hours, crucial for completing the task efficiently. The crew will organize tools and materials, creating an efficient space to work. You might see a dumpster or a designated area for debris. This ensures your property remains tidy and reduces the risk of accidents from scattered materials.
Roof Removal Process
Removing the existing roof is the first major task. This stage can be loud, with scraping tools and falling debris. Your roofing team might start at one end of your home, gradually working their way across. This methodical approach ensures thorough removal of old shingles, underlayment, and any compromised decking. According to the U.S. National Association of Home Builders, removing old roofing allows inspectors to spot and address structural damages hidden beneath layers. This critical step ensures the new roof isn’t just a cosmetic upgrade but a structural improvement.
Inspecting and Preparing the Deck
Once the old roof is removed, the decking is in plain view. It’s inspected for rot or damage, vital because any weaknesses could compromise the new roof’s durability. If repairs are needed, this step adds to the timeline, but it prevents future issues. Well-prepared decking is the foundation of any robust roof, so this aspect is non-negotiable. Trusted sources like the National Roofing Contractors Association emphasize the importance of addressing deck issues promptly.
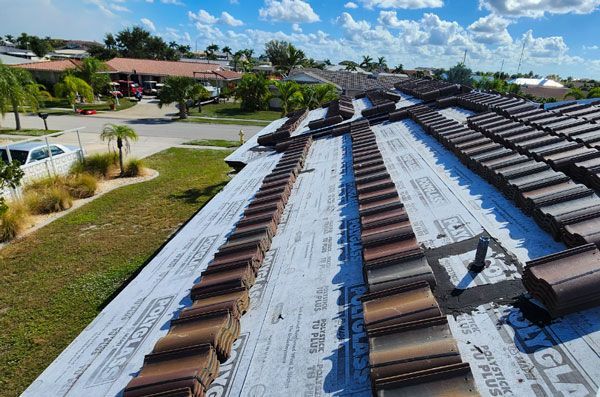
Installing Underlayment
Underlayment placement follows the deck’s preparation. This layer acts as a moisture barrier, protecting your home from leaks and enhancing energy efficiency. Brands like Owens Corning and GAF offer underlayments designed to withstand extreme conditions, beneficial in South Florida’s climate. The underlayment rolls out smoothly, creating a seamless barrier that’s critical for the overall function of your roof.
Shingle Installation
As the project progresses, you’ll witness the transformation as shingles or other materials are meticulously installed. Each shingle is placed with precision, starting from the lower edge and working upwards. This pattern, often referred to as the “stair-step” method, prevents water infiltration and ensures a consistent look. The presence of a shingle installation team using high-quality asphalt or tile means not only the shelter but the aesthetic of your home will improve. Industry guidelines, such as those from the International Building Code, dictate specific nailing patterns and overlap techniques, ensuring longevity and resilience against high winds.
Valley and Flashing Installation
Valleys and flashing are critical to preventing leaks in vulnerable areas of your roof. Metal flashing secures areas where water runoff could potentially sneak in, particularly around chimneys, vents, and valleys. Properly installed flashings made from materials like aluminum or galvanized steel offer corrosion resistance, crucial for coastal areas like Anna Maria. This attention to detail prevents leaks, preserving the integrity of the interior.
Clean-Up and Final Inspection
After installation, clean-up is integral and involves meticulously removing debris and ensuring no nails or sharp objects remain around your property. Responsible companies, including Roofline Roofing, will conduct a thorough inspection post-clean-up, often utilizing magnets to locate stray nails. This step confirms that both the workmanship meets high standards and your home’s safety is uncompromised.
Following these activities, your project manager or a representative will review the completed work with you. They will address any questions and confirm that the outcome aligns with agreed-upon specifications. Understanding each phase of the roof replacement process equips you to engage confidently with your contractor, ensuring that the investment you make in your home withstands both scrutiny and time.
Post-Installation: Cleanup and Final Inspections
A roof replacement project culminates in a crucial phase: post-installation cleanup and final inspections. These steps ensure your home transitions smoothly back to its everyday state while guaranteeing that the investment you made fulfills its promise of long-term protection.
Effective cleanup starts with removing all debris generated during the replacement. This includes old shingles, nails, and any excess materials from your yard and adjacent areas. A professional roofing team makes this operation swift and efficient, using tools like magnetic sweepers that systematically collect metal pieces. This attention to detail not only preserves the aesthetic of your landscape but also prevents safety hazards to your family, pets, and visitors.
For commercial properties, meticulous cleanup is even more vital. Safety regulations demand a clear, debris-free environment to mitigate any workplace hazards. Your facility manager should confirm that walkways, parking lots, and entry points are free from any obstructions. Professional roofers can streamline this process through a well-structured plan that includes sorting, recycling, and properly disposing of waste, following guidelines from organizations like the Environmental Protection Agency.
Once tidied up, the final inspection phase begins. This inspection is not just a cursory glance but a thorough evaluation of the newly installed roof. Inspectors will examine shingle alignment, securement, flashing installation, and underlayment integrity. They look for any visible defects or areas that may not meet workmanship standards. For South Florida’s unique climate, inspectors will ensure that materials are resilient against humidity, rain, and potential hurricane-force winds.
Partnering closely with your contractor during these inspections is beneficial. It provides an opportunity to witness firsthand the quality and durability you’ve invested in. Reputable companies often welcome homeowner involvement in the final walkthrough, explaining the nuances of installation and addressing any questions on the spot. This collaborative inspection not only reassures quality but also educates you on maintenance practices that can extend your roof’s lifespan.
For those handling large commercial properties, like in the bustling areas of Sarasota, involving your maintenance team in the inspection creates a knowledgeable group ready to handle future upkeep. Regular checkups and ongoing maintenance programs can be established based on the findings of this initial inspection, fortifying your investment.
Incorporating a professional roofing contractor for post-installation cleanup and final inspections transforms a potentially overwhelming task into a structured, efficient process. This ensures that once the workers leave, your property is not just protected under a new roof, but is also safe and pristine. For optimal results, maintain open communication with your roofing company, as they are a valuable resource in navigating all aspects of roof replacement cleanup in Sarasota, setting a solid foundation for years of home or business protection.
You might be asking
What are the typical stages of a roof replacement project?
The typical stages of a roof replacement project include a thorough inspection and assessment, followed by the scheduling of the project. On the day of the replacement, the old roofing material is removed, repairs are made to the underlying structure if necessary, and then new roofing material is installed. The final stage involves a thorough cleanup and a post-installation inspection to ensure everything meets local building codes and quality standards.
How long does a typical roof replacement take to complete?
A typical roof replacement can take anywhere from one to three days, depending on the size of the roof, the type of materials used, and the weather conditions. Larger or more complex roofs may take longer. A dedicated project manager will usually provide a more accurate timeline after the initial inspection.
What should homeowners do to prepare for a roof replacement?
Homeowners should ensure their property is prepared by removing valuables from walls and shelves, protecting fragile items, and ensuring vehicles are moved away from the house. It’s also advisable to inform neighbors about the upcoming work due to potential noise and to make arrangements for pets to minimize stress during the process.
Next Steps
Preparing for a roof replacement involves careful planning and communication, ensuring that each phase proceeds smoothly and safely. Having a clear understanding of the process, from initial preparation to final inspection, helps homeowners manage stress and maintain control. By choosing the right materials, coordinating with neighbors, and checking contractor credentials, you safeguard both your home and investment against Florida’s unpredictable weather. As the project wraps up with meticulous cleanup and thorough inspections, you’ll find that addressing these critical areas secures both the functionality and aesthetic appeal of your property.
Taking the next step in your roof replacement journey is easier when you’re equipped with knowledge and supported by professionals. A free consultation with Roofline Roofing could provide more detailed insights tailored to your specific situation and goals. Their experts can guide you through options that align with your home’s needs, ensuring you make informed decisions for enduring protection and value. Consider reaching out for this helpful resource, and let’s work together to secure your roof and enhance your home or business environment.
Contact Us
Use the form below to contact us or to schedule a free consultation.
I would highly recommend Roofline Roofing for any roofing needs. As a fellow business owner, their professionalism and efficiency stood out. They provided quality service, completed the job on time, and their pricing was fair. Very satisfied with their work!
-- Logan L.